Showing posts with label DIY. Show all posts

Friday, December 12, 2014

Holiday Snowman Cookies...

Posted by Unknown at 10:22 PM 0 comments

Thanks to a certain...ahem...Disney Flick, snowmen are all the rage at all times now. This holiday I think it would be super fun to hone in on some snowman themed cookies/candies/desserts since it will definitely peak the interest of the littles and because they are just so darn cute. This Melting Snowman Oreo Cookie ball from Cookies & Cups looks amazing and would be a good holiday themed project to do with the little ones.


These uber adorable melting snowman cookies are easy to whip up in a pinch and let the littles decorate to their Olafs content..errr... I mean hearts content. I found these cute guys over at Swanky Recipes.


Last but not least I love this unique twist on a holiday snowman cookie. Its a snowflake with an adorable snowman face. Kids and adults alike will love this and all you need is a snowflake cookie cutter and some polka dot making skills.  You can read about these guys over at Redbook.

Here is to yummy, scrumptious, kid pleasing snowman cookies! XoXo.


Monday, April 1, 2013

Its VEDA Time...

Posted by Unknown at 11:23 PM 0 comments
I am jumping on the VEDA bandwagon and am kind of excited about it! Its definitely a challenge for myself! I kicked it off today with a short video on the super budge friendly Spring or Easter party favor gift basket I put together.

VEDA stands for Video Everyday In April. If you are participating please be sure to leave the link to your channel below!

Happy April everyone!

XoXo.

Sunday, March 10, 2013

DIY Baby Name Banner...

Posted by Unknown at 11:20 PM 0 comments
I recently made a sort of rambly video on my DIY Budget friendly name banner I did for a Welcome Baby party I was hosting. It was super easy to create, super fun to create and easy on the wallet.
You can see here I used it behind my sweets table as a main focal point. I will be posting a more detailed blog of the party with pictures sometime this week. Instead of doing a baby shower since it was her second baby, we decided to throw a party after the baby was born as a way for friends to come and meet the new little one. I decided on the theme of  "Welcome the New Little Sweetie", thus the prolific sweets table.

More to follow.

Cupcake Carousel Display

XoXo.

Thursday, October 11, 2012

BlogOween: Candy Corn Cupcakes

Posted by Unknown at 5:51 PM 0 comments

With Halloween right around the corner (which I seriously dont know how that happened) I thought it would be fun to do a lot more Halloween themed type blog posts. Of course I need to give it a fun name as well...BlogOween it is. And what better way to kick this off than with cupcakes...yum.

Via Pinterest

Unlike the first photo I think I might actually be able to pull this one off. Simple yet festive and cute.

Via
Hmmm...I may be able to pull this one off...just need some good ole food coloring.

Via Pinterest

Okay, this has got to be the Over Achievement Candy Corn Cupcake...at least that is what I would call it. This seriously is a candy corn covered strawberry on top of a Halloween cupcake...whew....

Via Pinterest.


XoXo.

Wednesday, October 3, 2012

A Pinterest Story: Ode to the Pumpkin

Posted by Unknown at 8:37 PM 0 comments
 October is the spotlight month for pumpkins. Any other time of the year and they are just a large orange-y fleshed fruit with an unsightly rind. But 3 months before Christmas, the Pumpkin takes on a whole new meaning. They shine, glisten, sparkle, spook and conjure up the imagination of adults and children alike. Rows upon rows of pumpkins in every shape and size take a hold of October and claim it their time to dress up and take charge.
 The spray painted pumpkins (doubles as a house marker).
 The Initials (glowing).
 The Art Deco.
 The Glam.
 The Bedazzled and Bejeweled.
The Preppy.
The Apartment Complex.
The Sparkles (doubles as a centerpiece).

 And last but certainly not least the Au Naturale.

So their it was...the Ode to the Pumpkin. Thank you Pinterest for allowing the pumpkin its rightful spotlight (all pictures taken from Pinterest).

XoXo

Tuesday, July 3, 2012

Pinteresting Picks: 4th of July Edition

Posted by Unknown at 6:31 PM 0 comments

My Fourth of July Pinteresting Picks most certainly has to include this cute and classic patriotic inspired outfit from the one and only Atlantic-Pacific. Im absolutely loving the polka-dots and the DIY clutch. Wish I was this put together!


Yes please. I'll take a heaping serving of salty sweetness that is almost prettier than fourth of July fireworks. This visual delight comes from Cupcakes and Cashmere. 


And I thought I was Martha Stewart by simply knowing how to create chocolate dipped strawberries. Occasionally Crafty


Sunday, May 13, 2012

Sweet Shoppe Series Part 2: DIY Candy Initial

Posted by Unknown at 6:21 PM 0 comments
Candy Button Initial
Supplies

With Baby Z's Sweet Shoppe fastly approaching (next Saturday, YIKES) I have been crafting sweet projects all weekend long. I dont think I have ever been so surrounded by sweet things that I cannot eat. An easy project that I did last evening was this candy button initial for the mantel piece. It is so inexpensive and easy to make! 

I purchased all the items from Michaels. The wooden letter was $2.99 and they come in all different sizes.  The Martha Stewart Glitter Paint was just under $3.00 and the paint brush was $0.50.  The candy button package was $2.99 and I have plenty of them left over after gluing them to a pretty large letter. 
Martha Stewart Glitter Paint
The glitter paint is very thin and glittery. It took about 4 coats to get the consistency that I was looking for. Once your coats dry it is a really lovely sparkly finish. This paint comes in so many different colors so your possibilities with this craft are endless.
Candy Buttons
These are all the leftover candy buttons I had after finishing the craft. I didn't end up using the yellow ones as I thought they might not show up properly against the yellow paint.

I also picked up this photo/plate stand to prop my finished letter on. I think this also was just under $3.00. You could use candy hearts for this project as well. You could do the first and last initial or even all three initials. Its one of those projects that looks like it was harder to make than it actually was. You could use this on your dessert/sweet or gift table or use it to decorate a mantle piece as I am. 
On to the next craft!

View Part 1 of my Sweet Shoppe Birthday Series here!

Wednesday, November 16, 2011

DIY: Modge Podge

Posted by Unknown at 12:52 PM 0 comments


On a recent DIY shopping trip for supplies for my latest attempt at being crafty (look for a blog post soon on what I made. Hint: has to do with organizing necklaces) I stared in amazement at the cost of Modge Podge or in other words decoupage goup. Why is something that is so simple to make selling for such a high price? If you guys need to decoupage your lastest project consider making your own modge podge.

What you need:
  • Water
  • Elmers Glue
  • Mixing jar & something to mix with.
Yep that really is it. Didn't I tell you its super easy and cheap?

How to make it:

All you need to do is take your mixing jar and add 1 part glue and 1 part water. Depending on how much modge podge you need you just make sure 50% is glue and 50% is water. Mix and voila, you now haver perfectly perfect modge podge. I promise. I just did two semi-extensive projects with my homemade modge podge and it worked perfectly.

Dont Forget:

You can always alter it to meet your specific needs. Adding more or less water or glue can give you a thicker or thinner formula. Also remember it dries perfectly clear so no worries about ruining your project.

Modge Podge away...and for cheap!

Thursday, November 3, 2011

DIY: Simple Marbled Cupcakes

Posted by Unknown at 6:53 PM 0 comments
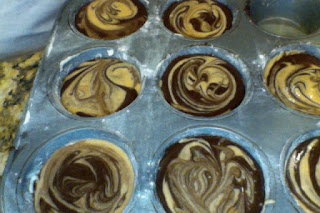
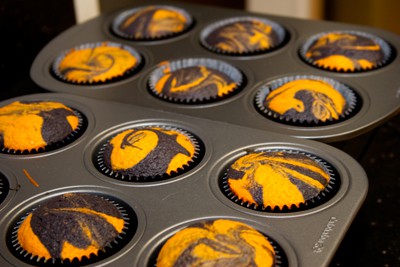
Marbling cupcakes is really so easy and fun. First choose which two flavors you want to marble together. For mine pictured above, I just stuck with a simple cocoa batter and a vanilla batter. The possibilities really are endless though and that is the fun part. I was thinking of the following flavor combinations:

  • Chocolate & Hazelnut
  • Lemon & Strawberry
  • Vanilla & Almond
You can also color your batter with food coloring. Its hard to tell in this picture ( and because I ran out of food coloring) but I dyed my vanilla batter a nice shade of orange since these ones were for Halloween.

Take your first layer of batter and place a spoonful of it on the bottom of the cupcake tin then take a spoon of your second flavor and place on top of first. Then use a toothpick or any other utensil that is long and relatively thin and gently swirl the two flavors together. Yes it is really that simple.

Sunday, October 30, 2011

DIY: GraveYard Plot Cupcakes

Posted by Unknown at 11:26 PM 0 comments
A easy, fun DIY Halloween cupcake activity that the kids can participate in! As you can see above we got a little tired of writing RIP on all the headstones so we got imaginative and put some ghost and pumpkin faces on some of them. Hey its Halloween, you can be as creative as you want.

The Plots ( Chocolate Cupcakes)

Ingredients:

  • 1 1/3 cups all-purpose flour
  • 1/4 teaspoon baking soda
  • 2 teaspoons baking powder
  • 3/4 cup unsweetened cocoa powder
  • 1/8 teaspoon salt
  • 3 tablespoons butter, softened
  • 1 1/2 cups white sugar
  • 2 eggs
  • 3/4 teaspoon vanilla extract
  • 1 cup milk

How To:

  1. Preheat oven to 350 degrees F (175 degrees C). Line a muffin pan with paper or with butter and a little bit of flour. Sift together the flour, baking powder, baking soda, cocoa and salt. Set aside.
  2. In a large bowl, cream together the butter and sugar until light and fluffy. Add the eggs one at a time, then stir in the vanilla. Add the flour mixture alternately with the milk; beat well. Fill the muffin cups 3/4 full.
  3. Bake for 15 to 17 minutes in the preheated oven, or until a toothpick inserted into the cake comes out clean. 


The Dirt ( Frosting & Topping)

Your plot (cupcake) will be topped with soil (frosting & oreos). I went with a cream cheese frosting which is really easy to work with. Once its time to top each cooled cupcake with the frosting you can put your frosting into a ziplock bag and zip the corner edge off for easy frosting. This works wonders and no expensive piping bag  is needed.
4 ounces cream cheese, room temperature
2 tablespoons unsalted butter, room temperature
1/2 teaspoon pure vanilla extract
1 1/2 cups powdered sugar
About 20 oreos, with filling scraped out. Take your oreos sans filling and put them in a ziplock bag. Crush them up into a fine texture (its ok to have a few chunky pieces left).
Beat cream cheese with your mixer until smooth and creamy. Add in butter and vanilla. Mix this at a medium to high speed. Lastly, add in your powdered sugar a little bit at a time and voila you have homemade frosting. Frost your cooled cupcakes and generously douse each one with your crushed oreos...errrr dirt.
The Headstones
You will need a bag of Milano cookies and a black gel icing tube. Cut 1/4 end off of each Milano cookie. Use your black gel icing tube to write on each headstone. Place cookie firmly into the icing. Voila!
Place finished cupcakes on a cupcake stand or on a platter and garnish platter with remaining crushed oreos for a very earthy graveyard appearance.
I had left over chocolate cupcake batter, so I quickly whipped up a vanilla cupcake batter, dyed it orange with food coloring (yellow + red) and created a Halloween themed marbled cupcake. Those are the ones you see below mixed in with my extra GraveYard Plot cupcakes.
Eat & Enjoy.
Happy Haunts.

Thursday, October 27, 2011

Pumpkins: More Than Just a Carving

Posted by Unknown at 1:33 PM 0 comments
This time of the month is all about the pumpkin. Halloween pumpkins, pumpkin patches, pumpkin bread, pumpkin pie, pumpkin spiced lattes...well you get the point. Is their anything else that can be done with this edible orange tradition we call a pumpkin. Yes....oh yes their is.

You can do fairytale re-creations with pumpkins if scary is not your forte. Pic found here.

We have pumpkin soup in a ...well in a pumpkin. Pic found here.
This pumpkin is about to become a punch bowl or a drink holder. Pic found here.


My personal favorite, pumpkin custard inside a pumpkin! Pic found here.

I just realized all my pumpkin pictures have to do with food. Ooops. =)

Wednesday, October 26, 2011

Kill My Diet Now: Halloween Cupcakes

Posted by Unknown at 10:24 AM 3 comments
Today's Halloween themed post is all about cupcakes! I absolutely must make some sort of Halloween themed cupcakes this year. As my mouth is watering looking at these pictures I just need to decide which ones to attempt. I found the above picture on Pinterest and my brain is straining to figure out how they got that perfect pumpkin shape.
Im a huge cupcake in a jar fan. Like huge. I think the possibilities when you take a Mason jar and a cupcake are endless. I might just do a post one day all about jars of cupcakes. I love making these. These festive ones came from Glorious Treats.

I love owls. I love cupcakes. Enough said.
I absolutely adore this black and orange marbled cupcake. I think I may just have to go for these ones and then get creative with the frosting and toppings. Can I just say one more time how much I love cupcakes?

Tuesday, October 25, 2011

Hauntingly Cute Decor

Posted by Unknown at 2:01 PM 0 comments
Ok with Halloween right around the corner I need to do a Halloween themed blog everyday until Halloween. Holidays are way to fun too not blog about as much as possible. =) Yesterday I blogged about some super cute baby cosutumes that I have been loving and today I want to share with you all my favorite Halloween themed decor. Its such spooky fun and I so wish I had time to make each and every one of these items. You can find out how to make the above burlap Halloween wreath here.
This candy corn candle holder idea is way too easy for me to not try out!
These black paper bats would be perfect for a kids halloween party. You can read a bit more about how to construct these here. They actually used black poster board on theirs but I was thinking you could do this with black construction paper you have laying around the house as well.

Buttons and bows on a pumpkin? Ingenius. I found this picture on Better Homes & Garden. They have some adorable pumpkin decorating ideas.

If you have done any Halloweed decorating and/or crafts lately please share! Leave a link to your post below or email me your pictures so I can feature them on here.

Happy Haunting.

Monday, October 24, 2011

SpookTacular Baby Costumes

Posted by Unknown at 10:26 AM 1 comments
Ok, so they may not be spooky but they are pretty darn cute. I have been saving picures I have found of baby cosume ideas for Halloween. Thought I would share the cuteness. Enjoy.

Have a cute costume pic? Email it to me so I can share it on here. =)


First picture from Pinterest.
Second picture from here.
Third picture from here.
Fourth picture from here.


Mrs Mommy Talk Copyright © 2010 Designed by Ipietoon Blogger Template Sponsored by Emocutez